Simple step winged eyeliner tutorial
To make winged eyeliner is very easy. Here we will share winged eyeliner tutorial. I use a cake eyeliner brush for this and LY24 from young Louise. Hopefully useful!


We would not recommend trying to do it all without lifting your brush because it's hard to keep the precision you like it so we break it down into three steps as follows:
Step 1.
Draw a thin line close to your eyelashes. Don't worry about any wing just yet. This line also doesn't need to be overly neat as we'll be going over it again later anyway. It's *really* important to tilt your head backwards when doing liner because you need your eyelid to be as flat and smooth as possible so that you get a nice fluid line.

Step 2.
Draw in the outer line of your wing. This should generally angle upwards in the same direction as your lower lash line. Just imagine that your lower lash line is continuing on upwards. If you have a hooded eye, however, you may need to angle your liner slightly more outwards in order to avoid the hooded area. The length of your wing is down to personal preference. If you want a dramatic liner make the wing longer and make it shorter for a more subtle one.

Step 3.
Now you need to connect the wing back to the line along your eyelashes. I've mapped it out here in red. Don't start at the very tip of your wing. Leave the very top of it alone as that part should be left extremely fine. Now connect the wing back down along your eye, gradually making it thinner as you reach the inner corner of your eye. So it should be thicker on the outer part of your eye and thinner towards the inner corner.


That's it! If you need to go over it again to fix any lumps or bumps or to thicken it then you can. Now you just need to line your waterline if you want to and apply your mascara and you're done!
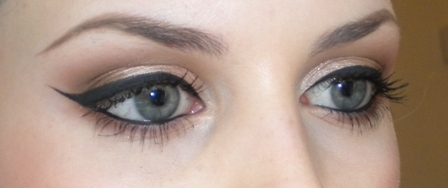
Here's the finished look with a lined waterline and some mascara.........